Working With AutoAnnotate
Panels
When an Annotation Set is created the AutoAnnotate panels will be shown.
Note
To show or hide the AutoAnnotate panels go to the main menu and select Apps > AutoAnnotate > (Show/Hide) AutoAnnotate Panels.
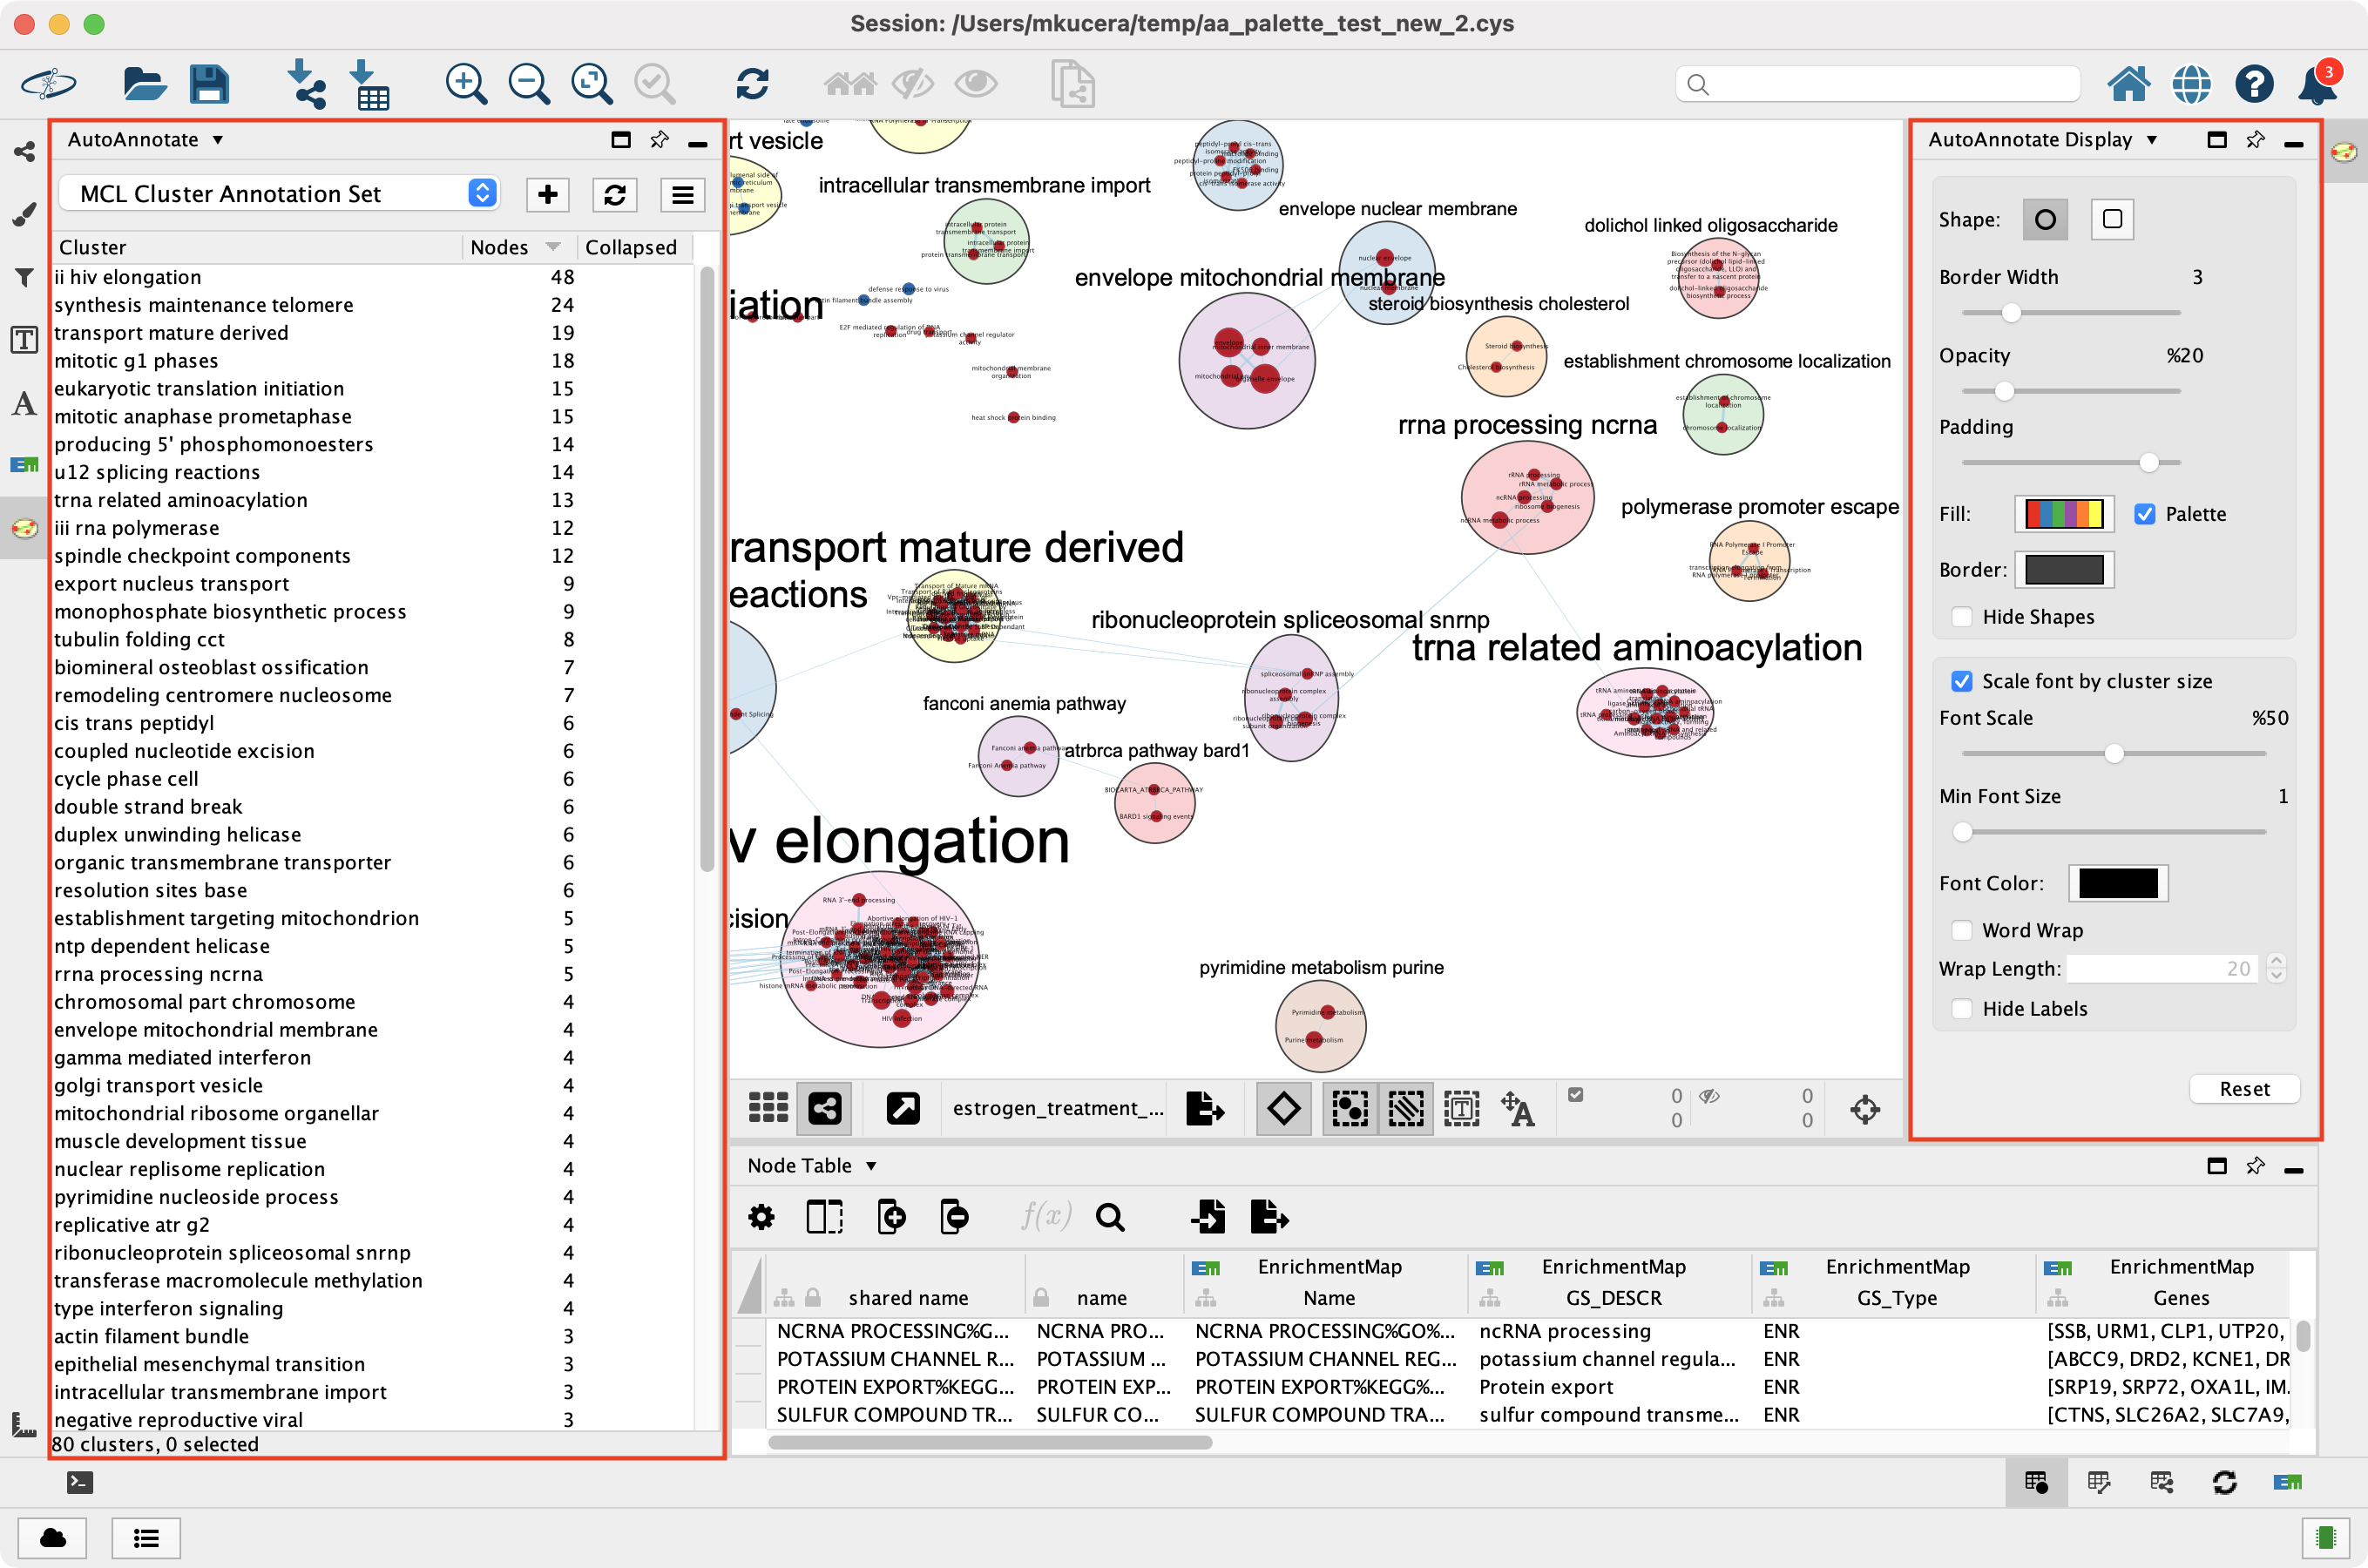
- In the Control Panel on the left side is the Main AutoAnnotate Panel.
- This panel is used to manage Annotation Sets and Clusters.
- In the Results Panel on the right side is the Display Options Panel.
- This panel is used to modify the look of the annotations.
Changing Display Options
This AutoAnnotate Display panel shows display options for the currently selected Annotation Set.
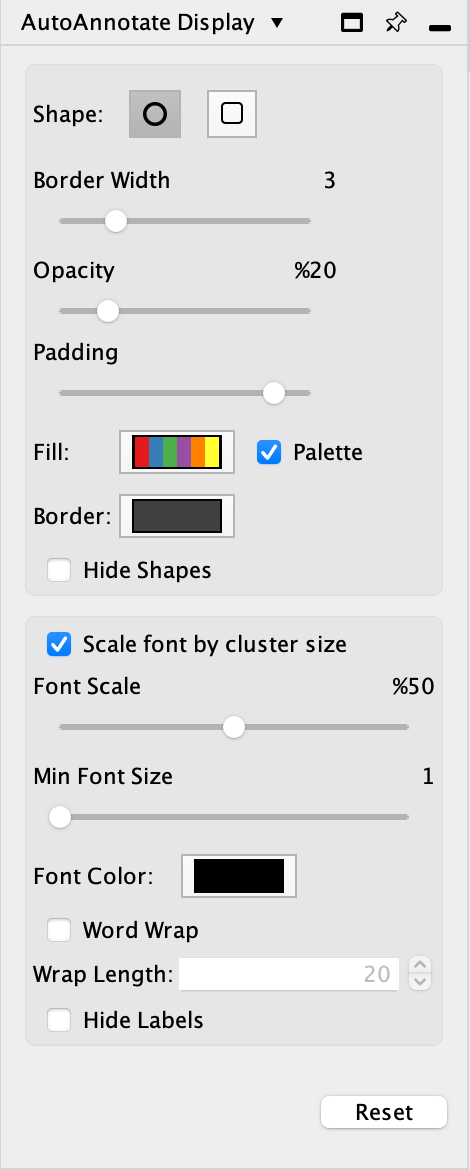
Shape Options
- Shape
- There are two available shapes: Ellipse or Rectangle
- Border width
- Slider that adjusts the width of the cluster annotation borders.
- Opacity
- Slider that adjusts the opacity of the cluster annotation fill color. Slide to the left for completely transparent. Slide to the right for completely opaque.
- Padding
- Slider that adjust the space between the content of a cluster and the annotation border.
- Palette
- When selected the annotations will have multiple colors from a color palette. The color of each annotation is chosen automatically from the palette.
- Fill Color
- Opens a color picker for choosing the fill color.
- Border Color
- Opens a color picker for choosing the border color.
- Hide Shapes
- Select to hide all cluster shape annotations.
Label Options
- Font Size
Slider that adjusts the font size.
- Scale font by cluster size
- When selected the size of the label will be relative to the number of nodes in the cluster. Larger clusters will have larger labels. When deselected all the clusters will have the same size labels. Slider is used to adjust the font size or font scale.
- Font Color
- Opens a color picker for choosing the font color.
- Word Wrap
Allows long labels to be broken and wrap onto the next line.
- Wrap Length
- Defines the maximum width of the label in number of characters. Individual words that are longer than the wrap length will not be broken. Has no effect if Word Wrap is disabled.
- Hide Labels
- Select to hide all cluster labels.
Reset Button
Sets all the display options back to their defaults.
Managing Annotation Sets
The main AutoAnnotate panel is used to manage Annotation Sets.
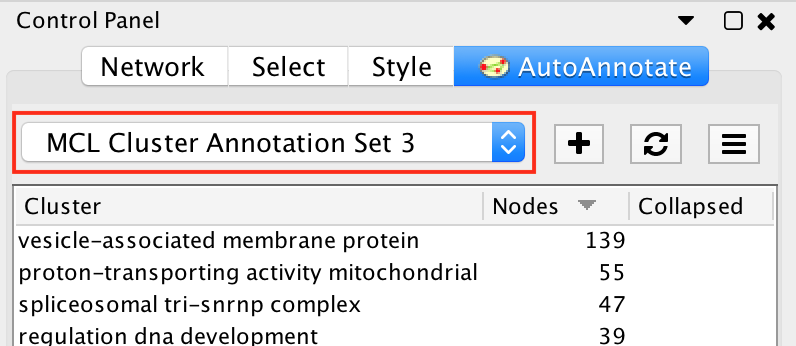
At the top of the panel is a dropdown box that allows you to switch between all of the Annotation Sets that have been created for the current network view.
- Select the (none) option to clear all annotations from the view.
- Select an Annotation Set to show all the annotations and labels in that set.
- When switching between Annotation Sets all the annotations in the view will be erased and redrawn.
- Similarly when switching Annotation Sets any collapsed groups will be expanded.
Annotation Set Menu
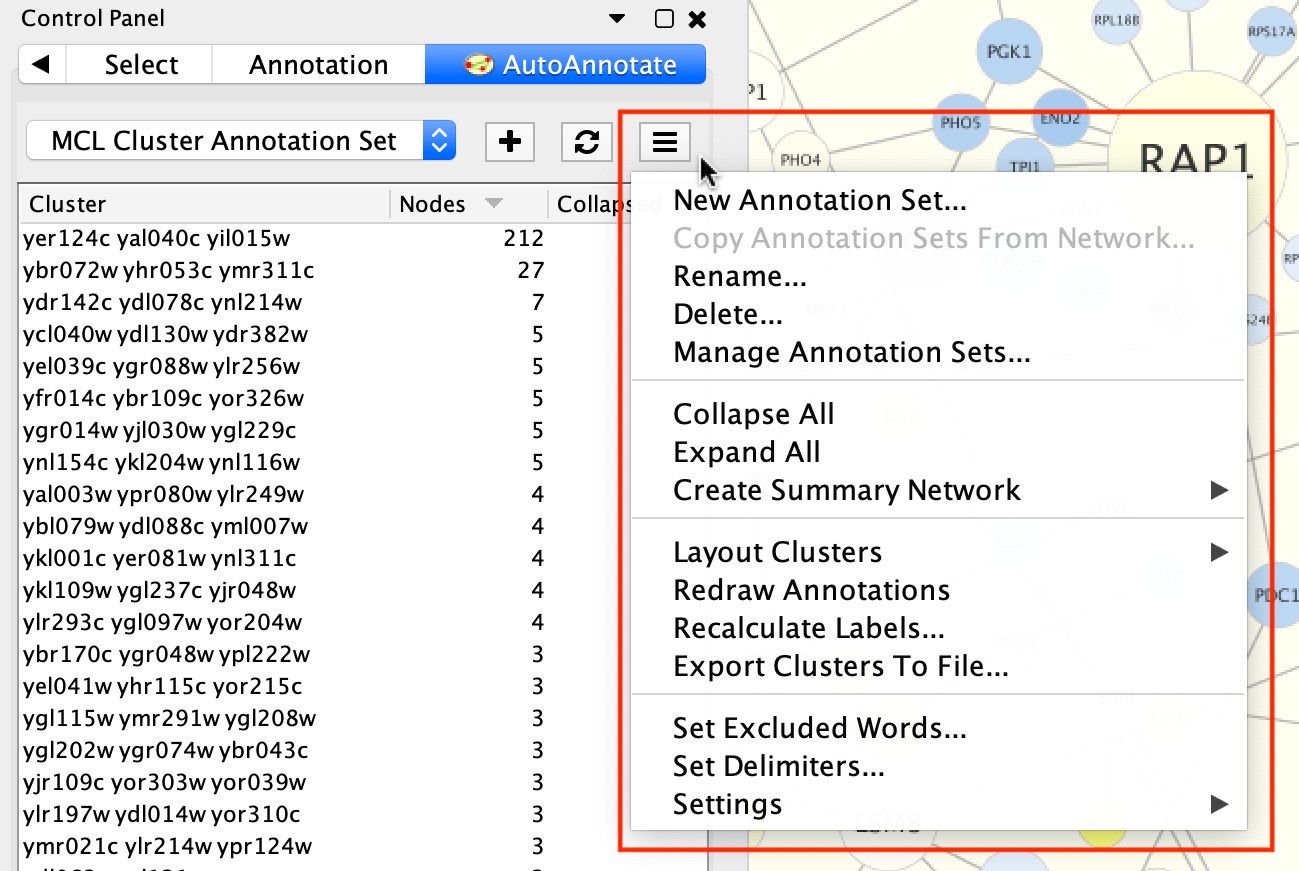
Click the  button to show the Annotation Set Menu.
- New Annotation Set…
- Opens the Create Annotation Set dialog. The dialog can also be opened by clicking the
button.
- Copy Annotation Sets from Network…
- Allows annotations to be copied from one network to another. See Copying Annotations Between Networks for more details.
- Rename
- Renames the current annotation set.
- Delete…
- Deletes the current annotation set.
- Manage Annotation Sets…
- Opens a Dialog where you can change the order that Annotation Sets appear in the dropdown and delete multiple Annotation Sets at a time.
- Collapse All
- Collapses all the clusters. Warning: Collapsing all clusters in a large network can be very slow. Consider using the Create Summary Network option instead.
- Expand all
- Expands all the clusters.
- Create Summary Network
- Generates a new network where each node represents a collapsed cluster in the original network. Very similar in functionality to “Collapse All”, but runs significantly faster. See Summary Network for more details.
- Layout Clusters
- The submenu provides access to cluster-aware layout algorithms. See Cluster-Aware Layouts for more details.
- Redraw annotations
- Some versions of Cytoscape have a bug that cause annotations to occasionally be drawn in the wrong location. Redrawing the annotations can fix this problem. Annotations can also be redrawn by clicking the
button.
- Recalculate Labels
- Recalculates the labels for all of the clusters in the annotation set. Typically used when the WordCloud options or label algorithm changes, or if the contets of one or more clusters change. See Label Options for more details. (Note: to recalculate labels for a subset of clusters please select the clusters in the table and right-click to show the cluster context menu.)
- Export Clusters to File…
- Creates a TXT file containing the labels of all the clusters.
- Set Excluded Words…
- Opens a dialog that allows you to exclude words from cluster labels. See Removing Words from Labels for more details.
- Set Delimiters
- Opens a dialog that allows you to add word delimiters.
- Settings
- Display Creation Parameters…
- Opens a dialog that shows the parameters that were chosen in the Create Annotation Set Dialog for the current Annotation Set.
- Label Options…
- Opens a dialog where you can select the label algorithm that is used when recalculating labels. See Label Options for more details.
- Settings…
- Opens a dialog where general AutoAnnotate settings can be changed.
Managing Clusters
On the main AutoAnnotate panel you will find the Cluster Table.
- This table shows each cluster, along with its label, the number of nodes in the cluster and a checkbox icon that indicates if the cluster has been collapsed.
- Click on a table header to sort the table by that column.
Most of the cluster options are available using the context menu of the cluster table.
- Start by selecting one or more clusters in the cluster table.
- To select multiple clusters hold the Shift key to select a range or hold the Ctrl/Command key to select individual clusters.
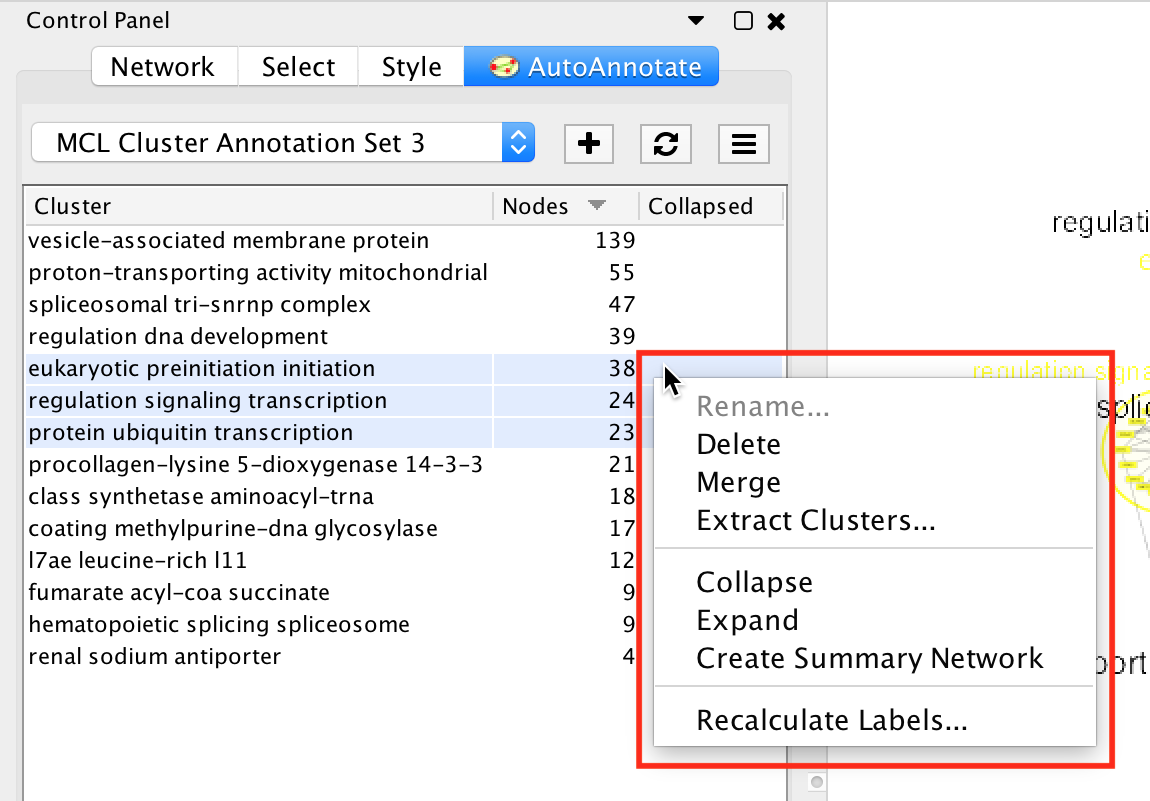
Right click with he mouse to show the cluster table context menu.
- Rename…
- Enabled when 1 cluster is selected. Manually set the label for the cluster.
- Delete
- Delete the cluster annotations. Note: This does not delete the nodes or edges in the cluster, just the annotations.
- Merge
- Enabled when 2 or more clusters are selected. Merges the clusters into a single cluster. A new label for the merged cluster is automatically calculated.
- Extract Clusters…
- Creates a new Annotation Set consisting of the selected clusters.
- Collapse
- Collapses the selected clusters. Warning: can be very slow when many clusters are selected.
- Expand
- Expands the selected clusters.
- Create Summary Network
- Generates a summary network from the selected clusters. See Summary Network for more details.
- Recalculate Labels
- Recalculates the labels for the selected clusters. See Label Options for more details.
Managing Clusters in the Network View
To manually create a cluster select some nodes in the network view, right click to show the context menu, and select Apps > AutoAnnotate > Create Cluster.
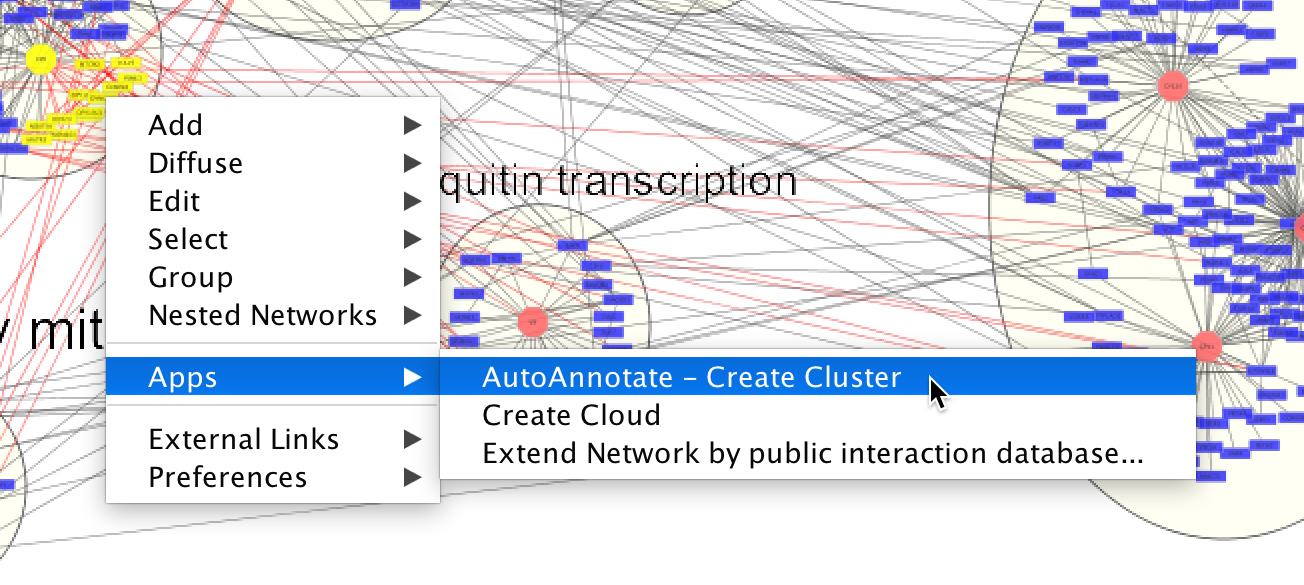
- A new cluster is created.
- A label for the cluster is automatically calculated.
- The cluster is selected in the cluster table.
Deleting a node in an existing cluster will remove the node from the cluster. A new label is calculated.
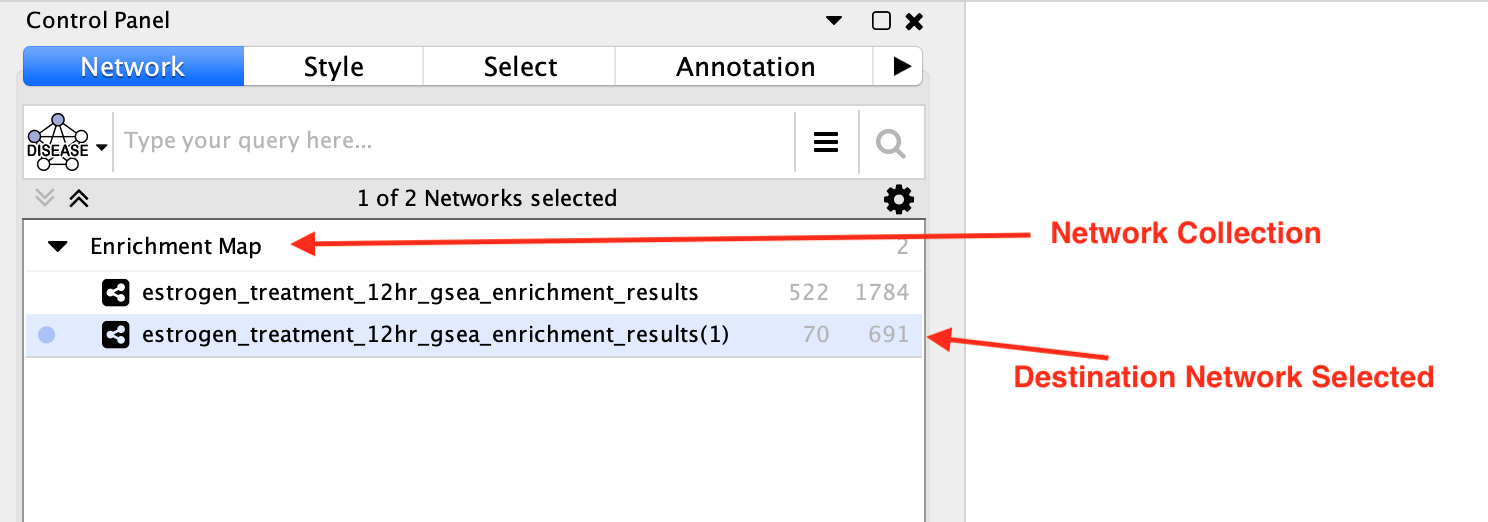
Copying Annotations Between Networks
Annotations can be copied between networks in the same network collection only.
Start by selecting the destination network in the Networks panel.
Then go to the AutoAnnotate panel and select Copy Annotation Sets from Network… in the panel menu.
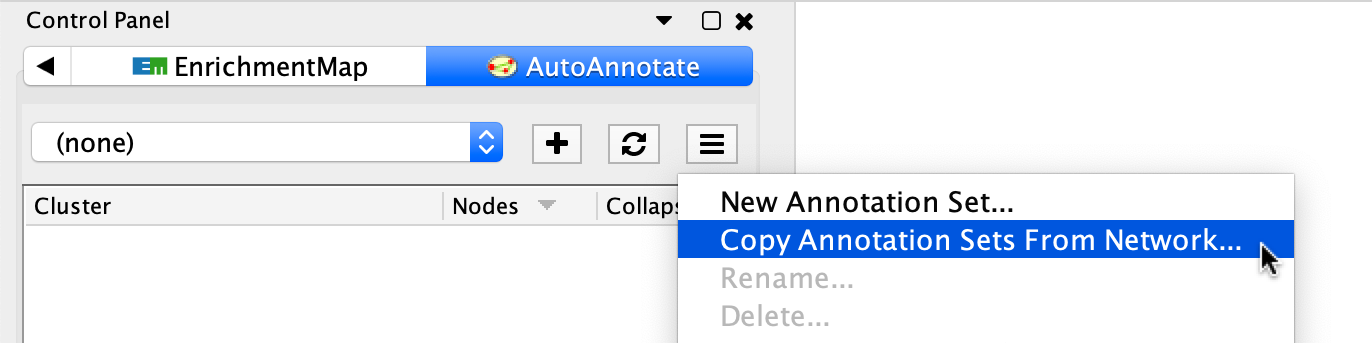
The Copy Annotation Sets dialog will be shown.
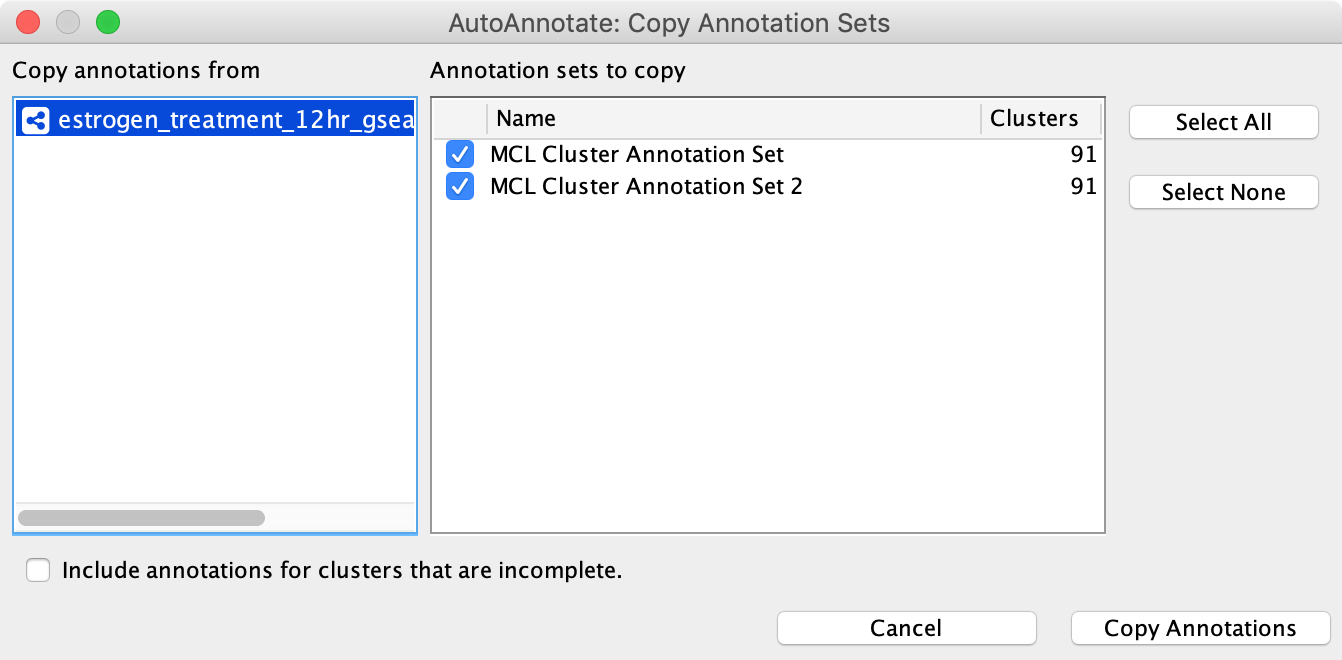
Select the source network to copy annotations from. A list of annotation sets for that network is shown. Select the annotation sets to copy. Finally click the Copy Annotations button.
If the destination network contains fewer nodes than the source network then only the annotations for clusters that exist in the destination network will be copied. Select the Include annotations for clusters that are incolmplete option to copy annotations for clusters that do not have all their nodes present in the destination network.
Additional Options
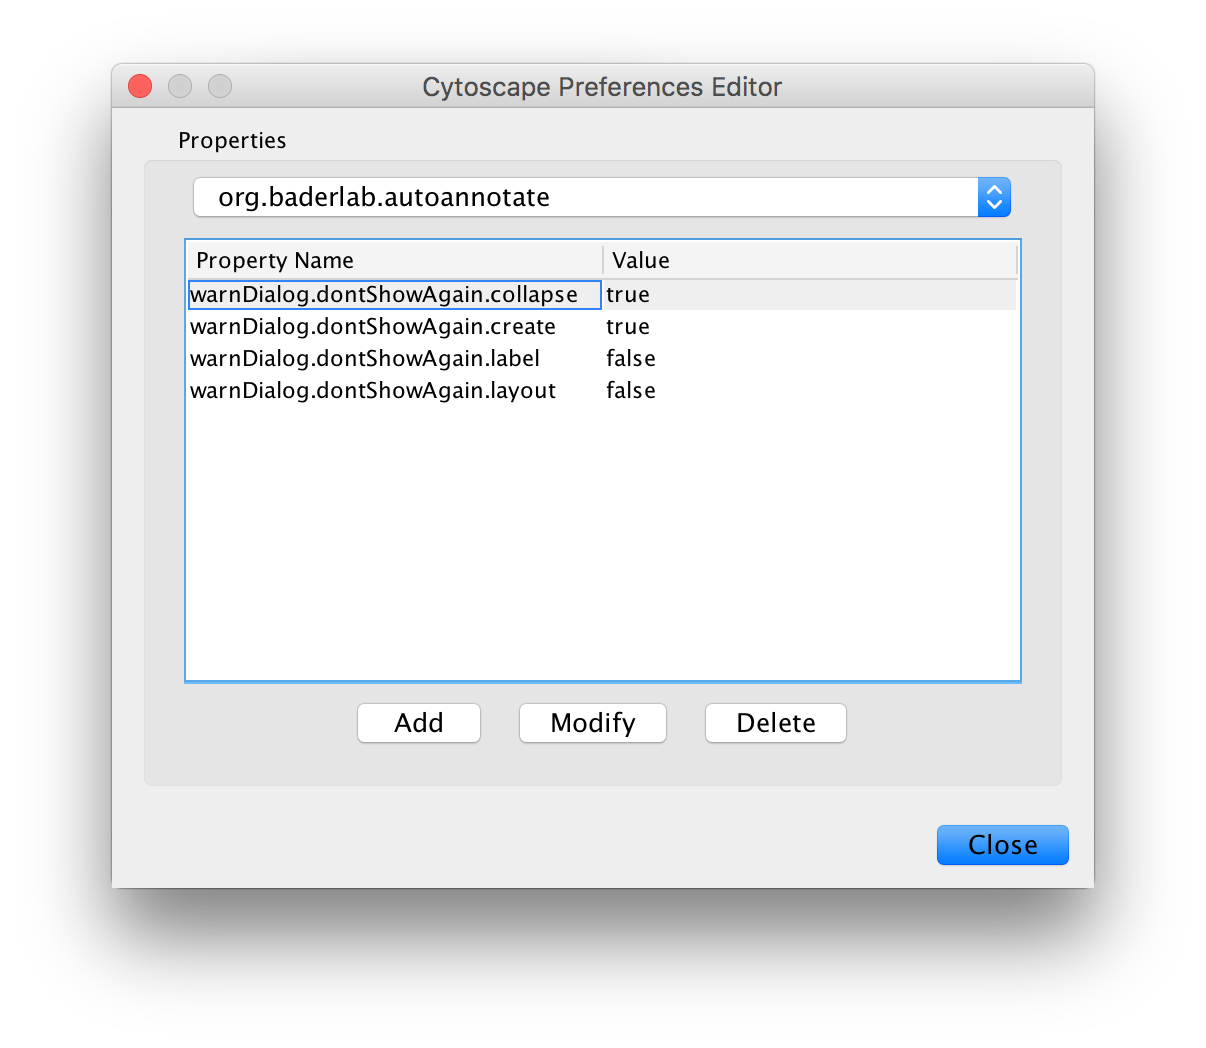
AutoAnnotate has various warning dialogs that can be dismissed permanently by selecting “don’t show this again”. If you would like to see these warnings again they can be re-enabled. In the main menu select Edit > Preferences > Properties, then select org.baderlab.autoannotate in the Properties Dialog.
Creating Summary Network
Using group nodes to collapse clusters can be very slow when there are many clusters. As an alternative a new option called Create Summary Network has been added in AutoAnnotate 1.1.
See Summary Network for more details.